Monthly Archives: December 2016

“Yoga Advil” For The Crazy Festive Chaos

By Susi Hately, BSc. Kinesiology, C-IAYT Yoga TherapistTQN_1806

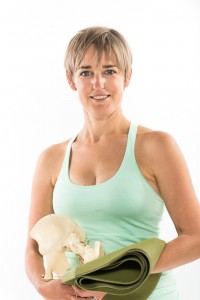
Last weekend a friend posted on Facebook that he was headed to one of the bigger malls in Calgary “on the last Saturday before Christmas and to check back in with him to make sure he came out alive”.

If you too are feeling overwhelmed by the hoards, havoc and the sometimes chaos that can arise in these last few days, here is are two easy breathing techniques that can support you.
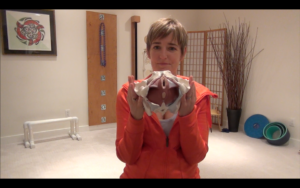
1. Straw Breathing

What I love about straw breathing is that it very naturally lengthens the exhale. How? Breathing through a straw requires you to lengthen your exhale. The real beauty of this exercise is you don’t have to think about trying to lengthen your exhale, which can cause mental tension and frustration – you are just breathing through a straw, and the straw does it for you.

Why it works. It is often believed that to get more breath in, the inhale needs to be deeper. In reality, if you empty your exhale completely you will often get a much fuller and more effective inhale in. This can go a long way to feeling calmer, more at ease, and more able to deal with some of the goofiness that can arise during this festive season.

How to do it:

  • Sit quietly with back against a wall or in a chair. You can do this on your back too.
  • If you are sitting be sure your pelvis is settled equally between the sitting bones.
  • For 1 minute, breathe normally and count the number of breaths you breathe – on the exhale.
  • After 1 minute, place the straw between your lips and exhale through the straw. Inhale through your nose. Continue breathing like this through the straw for 3 minutes. Exhale through the straw, inhale through your nose.
  • Count your breaths again for 1 minute and notice what has changed.

Over time, you can increase the straw breathing from 3 minutes to 10-15 minutes.

Note: There are people who will find that straw breathing makes them feel claustrophobic, and more anxious. Please do not try to force your way into the exercise. Just drop the straw, and try the following.

2. Reverse The Cycle of Your Breath

Even though breathing is a continuous cycle, we often think of breathing as inhale first then exhale. This exercise shifts it up, focuses moreso on the exhale, which can bring about feelings of calm and ease.

Why it works. It comes down to perception, shifting awareness and focus. Just by changing your focal point, the feeling inside can also shift.

How to do it:

  • Sit quietly. Breathe.
  • After a couple of normal cycles, focus on exhale first, then inhale.
  • Repeat 6-10 times. Notice what you are aware of, what you are present to.
  • Continue for another 6-10 times. And again notice.
  • Bring the exercise to a close. Pause for a breath or two, and continue on.

Take care of yourself this festive season.

Enjoy,
Susi

Exploring the Pelvic Floor

By Susi Hately, B.Sc. Kinesiology, C-IAYT Yoga Therapistthe-pelvic-floor

During my over 20 years helping people get out of pain, I have seen many trends in yoga and therapeutic yoga practice come and go. Some, which were based in organic principles have stuck and have since integrated into our collective understanding and wisdom of how the body works. There are others that were less sticky and don’t or didn’t quite integrate into the general school of thinking. Their time, so to speak, hadn’t, or hasn’t yet come. The pelvic floor and how we engage it, falls into this latter category, and is only now just starting to emerge into our understanding as an integrated part of our practice.

I remember when the pelvic floor started to become a focal point in rehabilitation. It was 1995, about the same time that the transversus abdominus was also being highlighted in the fitness and rehab industries and together it was found that co-contraction was needed between the transversus abs, multifidus and pelvic floor in order to re-create the stability that is vital for managing or overcoming back pain.

This insight and understanding, however, led to a bit of a myopic focus on the pelvic floor. Instruction and cueing from a “global focus” of the co-contraction, was shifted to “lift and engage”, and for men, “pull the boys up”. When this instruction entered into the yoga world, engaging “mula bandha” became the go-to translation for lifting the pelvic floor.

I’ll happily admit that for many this worked – their back pain went down. There was also a massive number of people, though, for whom it didn’t work. Their back pain continued to manifest, and in many cases became worse. As time went on, it became clear that more and more yoga, pilates and fitness practitioners were over contracting their pelvic floor. This was leading to orthopaedic issues in the hip, SI joint, back, knees, feet, shoulders, neck and jaw; as well as digestive and sexual health issues.

So, as we grow our knowledge of how the pelvic floor works, especially in conjunction with all the other components of the body, the question remains, “what to do we with this, and how can we improve the health and wellbeing of the pelvic floor while also improving overall health and well-being?” Here is one way to explore.

Exploring the Pelvic Floor

The Pelvic Floor quite literally forms the floor of the torso. It also provides for the passage of fluid and matter. It needs to be both strong and supple. The orifices need to be able to contract and release. We want them to experience “openness”

One the most effective ways I have found to help students experience this is the following:

  1. Lay down on the floor – whether on your back or front.
  2. Feel for your pubic bone, sitting bones and coccyx. They create the boney “diamond shape” that outlines the pelvic floor.
  3. Feel the orifices of your pelvic floor – anus and urethra; or anus, vagina and urethra. Imagine that you can breathe through them. Don’t try to force this, nor try to lift on either phase of breath. Just imagine breathing in and out through the pelvic floor.
  4. If you are having trouble with this, try changing your position, lay on your back with soles of feet touching, or come into table top.
  5. Let your jaw and mouth relax, let your breathing relax – allow it to lengthen. As this happens, does anything new arise in your pelvic floor awareness? What do you feel? Now relax your glutes, inner thighs, feet. Anything new arise? Next focus on your face…relax there too 🙂 What do you notice.

Here are some tips while working with this exploration:

– Notice how the diaphragm and pelvic floor form the top and bottom of the inner core container, respectively. There is a connection, and both impact the other.

– If you find that you are thinking or working too hard trying to make any part of the exploration happen, consider sitting on an exercise ball with a heating pad. Sometimes warmth helps bring focus to the pelvic region.

– Many people over contract when they do this exercise. Relax and breathe. Just think pelvic floor awareness and easy breathing. No glutes, no adductors, nothing else! 🙂

If you want to take this exploration further, I am running the Female Core and Pelvic Floor Online Conference on March 1 and 2, 2017. To register, visit this page – https://www.functionalsynergy.com/product/female-core-pelvic-floor-online-conference/   We have a great line up of experts who also have compassionate hearts. Each has at least 10 years of experience working with women, and most have well over that. It will be a great session.

Have fun exploring,

Susi

Whack a Mole

By Susi Hately, B.Sc. Kinesiology, C-IAYT Yoga Therapist

(courtesy of Google Images)

As a yoga teacher, have you ever had the following experience as you taught yoga to a private student or group?

A Yoga Teacher sees their student in Downward Facing Dog, and their palms aren’t flat on the floor, and the weight is shifted to the lateral side of the hand. They cue the student to bring the palms to the floor. When the student does this, their head lifts up, so the teacher asks the student to bring the head down, which follows with the student’s ribs flaring. The teacher, again cues the student to bring the ribs in and the back rounds, and after the teacher asks or adjusts the student to lengthen their spine, the palms lift up. While this may be amusing to read, this veritable game of ‘whack a mole’ leads the teacher to wo

nder, “why on earth are the cues offered not working?”

Many times when I meet these teachers they are in a state of resignation which ranges from “the students don’t have body awareness, so I can only take them so far” to “I am done with yoga, I can’t make a difference”, to maybe even “I suck as a teacher”.

How is this situation resolved?

Provide Alignment Cues At the Right Time: The biggest and most influential consideration is if you are providing alignment cues or adjustments after the student has come into the pose. If you are, it is too late. The student has already compensated their way out of alignment, and adjusting them after the fact, will only cause more compensation. The key is to notice the compensation when it occurs and make the appropriate adjustments at that time, even if it means stopping the movement and starting again.

Watch Your Student’s Actual Movement: Consider how you are watching your students. Oftentimes, the focus is on the end result, which is what leads to “whack a mole”. Watch your student as they move into the pose. Using the example of Downward Facing Dog above, notice where and when the weight shift of the hands happens. It likely didn’t happen at the end position, rather it happened on the way to the end position. If you can bring awareness earlier in the movement, your student’s pace of progress will improve dramatically.

Understand Your Student’s True Capability and Build From There: This last point might not be well received by some. Consider that most yoga poses, while super cool and fun, are inaccessible to most yoga students. Most yoga students do not have the mobility, stability, strength, nor the control or coordination to be able to move many of the quintessential yoga poses (hence the Downward Facing Dog dilemma above). They can compensate well to get into the pose, but that level of compensation isn’t really serving them, it isn’t building their core, it isn’t helping them to release tissue, or become stronger,and in many cases is setting them up for getting tighter and experiencing tension or injury.

All is not lost. Once you shift the way that you are seeing, and what you are focusing on, the changes in your practice – whether as a teacher or student – will blow your mind. Tightness and injury created by your practice will be a thing of the past, and suppleness and ease will grow.

Would you like more? If you would like to raise your game and to learn to be a teacher who can improve your students awareness of their body and make a lasting impact on their health and wellbeing, consider the I Love Anatomy Online Training in February. Early bird registration is on until December 31, 2016. To register, click this link –  https://www.functionalsynergy.com/product/love-anatomy-feb-2017/

Happy Exploring,

Susi