Monthly Archives: January 2017

I Loved Jane Fonda, And Then I Let Her Go

By Susi Hately, B.Sc. Kinesiology, C-IAYT Yoga Therapist

Okay, I will admit it. I was one of the masses who bounced in front of my TV in the early 80s to Jane Fonda’s original workout. A short stint of cardio, quite a bit of “feeling the burn,” and an odd desire to wear leg warmers while “working out.”

It brings a smile, doesn’t it?

Now you may be wondering – what the heck does this have to do with yoga, or with anything really, or even with the year 2017 (can you believe it has been that long since Jane’s inaugural video)?

Jane was the leader of many who motivated people to be their best with expressions such as “make it burn,” “no pain, no gain,” “come on, a little higher,” and “you can do more.” As time went on, those lines became part of our thought consciousness.

Enter the 90s, when people started to look for something a little gentler, whole body and mind, more fluid with a little less pounding and pushing. Yoga became mainstream, but the thought patterns remained the same.

Which is why I have been telling people, of a certain age, “to let Jane go”. To let go of the effort, to not try so hard. It doesn’t matter which pose they are practicing, what CrossFit WOD they are doing, or if they are Spinning, Pilates-ing, Running…whatever.

When you “let go of Jane” something happens – physically, neurologically and psychologically:

1. Physically, breathing is better, your body relaxes, as does your soft tissue. When shortened muscles relax, there is greater strength.

2. Neurologically, your system settles. As well, the heart rate slows down, blood pressure lowers and there is a greater level of awareness. Basically, you “feel more”, your introspective awareness increases, and often, you end up going further into the yoga pose – with greater ease. You end up running, lifting, pushing and pulling with much less effort. All of this “going further and doing more” often happens quite quickly, and it feels good. There is much less force, less grip and much more inherent strength and stability. And it feels way better.

3.   Psychologically, there is less attachment, and a greater acceptance with what is real and what the body is accomplishing in this moment.

“Letting go of Jane” also applies if you want to step out of pain. Whether you have a chronic rotator cuff issue, sacro-iliac joint pain, back or neck pain; or a psoas muscle that just . . . won’t . . .release, the act of not pushing so hard will also work for you.

Why? If you are in pain and you want to get out of pain, yet you push your way whatever activity you are doing, the following happens:

1.   Your muscles and connective tissue resist.

2.   You end up compensating elsewhere leading to more tension and more stubborn holding patterns in your body.

3.   There is a tendency to hold the breath, and a tendency to use the breath to stabilize rather than your deep core muscles.

4.   You won’t relax as easily and whatever strength you build will be built on top of tension which creates an inherently unstable foundation.

5.   Your chance for re-injury increases.

Applying “letting go of Jane” in your practice, or if you are a teacher, with your students looks like this:

1. Relax into your movement. If you think about relaxing as a segue to movement, you will be much more likely to “let go.” As you continue to move with relaxation, your strength will improve. Remember, tight muscles are weak muscles, so as tight muscles relax, they will become stronger.

2. Breathe easily. Notice if there is any tension, bracing or “heldness” when you are breathing. If there is tension, back off in order to find the ease. Remember, you want to use your breath to breathe, not to stabilize.

3. If you feel strain or ache, ease out to a position of no strain-free or ache-free. Feel for the non-pain sensations to emerge.  (If you have pain or strain constantly through your day, then be sure that your pain symptoms don’t increase with your practice or workout).

4. Don’t believe that your “bad back” or “bad knee” will be “bad” forever. I have seen so many people increase their range of motion, strength, and stability while at the same time reduce or eliminate their aches, strains, or pain.

5. Remember, relaxing is not doing nothing.  As Indira Gandhi said, “You must learn to be still in the midst of activity and to be vibrantly alive in repose”. It may be helpful to consider relaxation in movement as relaxed resilience. You will cultivate greater strength.

6. Instead of saying to yourself, “Ooooh, a little further,” say, “Relax just a little more.”

Now there is one “downside” to this kind of practice – especially for the type-A personalities, the driven and motivated individuals in the crowd. The downside is that you will “feel”. This way of practicing may be interpreted as a waste of time, particularly if you have a sun salutation to get through, a headstand to accomplish, or a certain weight lift or time to beat.

This can be a tough pill to swallow. A teacher or a coach can guide you to feel certain parts of your body, and, if you are willful about it, you will hang on and the gains you are seeking will elude you. You’ll build tension, you’ll gain tightness and you’ll wonder why after all this yoga practice your hamstrings are still so darn tight, or after all the working out you are not making many strength gains, or your running speed is still the same.

However, if you can come to the edge of being aware and take a chance at relaxing while you are moving – even for just 2 minutes – you will experience something amazing.

Imagine just how much easier and suppler you could fee. How much faster you could run – with less strain. How much more weight you could lift.  Often it isn’t about doing more  . . .

Enjoy,

Susi

Pain In Yoga: What is Normal, Doesn’t Have To Be Normal

By Susi Hately, B.Sc. Kinesiology, C-IAYT Yoga Therapist13606784_1292076707471834_8347182743612104062_n

The premise behind many of my continuing education training for yoga teachers is that people don’t need to experience pain in their yoga practices…that while many people think that pain with yoga is normal . . .  that their back, si joint, neck, wrist and knee pain is “just the way it is”. . .  it doesn’t have to be a normal part of their life.

As you can imagine, based on my philosophy and what I teach, about 85-90% of teachers who attend my trainings have pain. And quite consistently,  as each hour goes by, participants experience a profound change in their bodies. New sensations arise – sensations other than pain. Often these lead to either ah-ha! experiences  or a look of dumbfoundedness. The feeling of less or no pain is often absurd to them. It is not uncommon for me to hear the disbelief, “this pain has become my friend, it is weird not to have it, I almost want to go looking for it.”

I understand the dumfoundedness and disbelief. I understand the sheer weirdness of moving out of pain and into something more comfortable. It is bizarre…..because it is uncommon.

In Canada there is a commercial for a common pill used as an anti-inflammatory and muscle relaxant. The premise is – “do you think pain is going to stop me”? There is another ad for competiting product with the premise of “what you do when you don’t have pain is up to you”. What these products are selling is “pop this pill to get rid of your pain, and get on with your life.”

This blends well into our cultural psyche (at least in North America). “Pain can’t be really gotten rid of, so let’s mask it and carry on anyway.” Said another way, “Forget about listening to your body, it isn’t saying anything worthwhile, so suppress any sensation and carry on. This pill is your saviour”.

Not one to mask my emotion…this makes me feel really sad. Sad because there is a wealth of understanding within our body that is trying to make itself heard. Sad because there is a belief that we are pieces of Lego stuck together and if we can’t change out a piece of Lego, there is nothing more that can be done. It is sad, sad, sad. We don’t have to rust and wither away. In my over 20 years of designing therapeutic programs, I have seen peoples’ bodies shift far too far too many times to discount. Older, younger…age doesn’t matter.

If you have read this far, you may be asking “wel…now what”?

Here is what has worked for the thousands of people I have taught.

1.  Try to not “fix” yourself. There is nothing to fix. I know this may sound weird. However, if you think or have been told that your sacrum is torsioned “this way” and your one hip bone is lifted “that way”, and your rib cage is moving “in this direction” and your neck in “that direction”, don’t try to make them go the opposite way. How your sacrum, hip bone or rib cage got to the place it did is often not for the reason expected. As such, the way the body unwinds and unravels tension and awkward holding patterns isn’t often the way we think it will go.

2.  Move in as pure of movement as you can. Each of your joints has an optimum range of motion. You have felt this before – whether post workout or massage – your joint range is different. What is optimum depends on what you have done. Same applies if you are due for a hip replacement, have osteo or rheumatoid arthritis or you are simply darn tight, your joints optimum range is what it is. Move in that available range. Listen and limit your full body motion to accommodate what your joints are saying to you. Time and time again, those folks who move in a purer range of motion, those folks who don’t push beyond what is truly available, improve a lot faster than people who don’t. In fact, the people who don’t….simply don’t improve.

3.  Move in a range that doesn’t increase pain. If you continue to move in pain, your body and particularly your nervous system will see this as an appropriate stimulus and will respond “in kind”. It will give you back tension and pain. If you move in a range that doesn’t increase pain, your body will give you back less pain, more ease and freedom..

4.  Your yoga practice or workout are meant to be enjoyed.  Yes, it may be hard work, there is a difference between being effortful and strain/pain/tension/pain.

5.  And yes, pain does not have to be part of your life. It can reduce, it can be managed, and it can be eliminated.

If you are at all feeling skeptical about what you read above, give it a go anyway and see what happens. Break these ideas into smaller pieces – as in, only when you are on your mat, or doing your workout, keep yourself in a range that doesn’t let your pain symptoms increase. Go about your day as normal.

Also, I used to believe it was just me – my training and my experience – that enabled me to help people get out of pain. Every week I receive emails from teachers I have trained, or who have read my books and who are applying these principles not only in their own practices, but with their students, and they are seeing their bodies change and their students’ bodies change as well. So, I know it isn’t me. It is about using principles that follow Natural Laws – moving well, in a range that doesn’t increase pain, don’t force, find ease, there is nothing to fix, move from your joints.

There is a way to get out of pain and/or to significantly reduce the pain you are experiencing. Just give it a try. Let go of cultural psyche, and trust in your body. Your body is talking to you. Get quiet. Listen to the whispers. If you do, I guarantee that you won’t have to continue to deal with or suppress the screams.

You too can experience less pain.

Yes, even you,

Susi

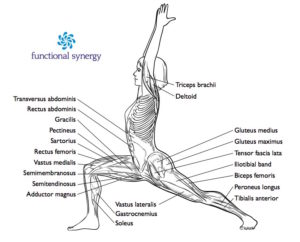
Anatomy and Asana: Warrior 1

By Susi Hately, B.Sc. Kinesiology, C-IAYT Yoga Therapistwarrior-1-labelled

There are about seven yoga poses that have specifically had an impact on my growth as a teacher and yoga practitioner. One of those is Warrior 1. I have a distinct memory, from 15 years ago, of a yoga student who was riddled with pain and who wanted to be more comfortable in this pose. I helped her move better and almost fell over when I saw her vibrancy emerge. The pain through her body shifted, literally in a moment as her body settled into more comfort, strength, and ease. Her breathing seemed to blow wide open. It was amazing for me to see and added a huge boost to my confidence in those early days of trial and error.

Much of what I teach with Warrior 1 has been informed by that experience. Ultimately, it’s about finding ease, which in turn uncovers strength, suppleness, breath, and more ease.

Let’s dig deeper.

If you have been to a training session with me, you will know that I don’t tend to teach the “how tos” of the yoga poses. My job is to share my knowledge of functional anatomy, feeling, and subtle movement and how these features can create not only a situation for healing and recovery but also a pain-free practice – a practice that really serves your life as a yogi or yogini. From what I have seen, the yoga poses simply emerge from the body, naturally, organically in a very fluid way – and the practitioner begins to experience asana for what it really means – “sitting comfortably and still”. It’s a treat to see.

However, when it comes to Warrior 1, my views become stronger. I have seen many people burn themselves in this pose – in their knees, SI joints, backs, and shoulders. And it’s due to one primary thing.

Unsquare hips.

The process I see goes like this – I watch people step backward into Warrior 1, and I watch as simultaneously their pelvis becomes unsquare. I continue to watch as they re-square their hips – from a place of force and pull. Often their foot is grounded, making the matter worse. (Just typing this paragraph makes me hold my breath.)

So what would I love to see happen?

I’d love for people to get really clear about what is happening in their hip socket. The femur moves in six different directions. When we step back into Virabhadrasana 1, two movements are required – external rotation and extension. These are the movements that need to be cultivated. If you do, your pelvis, SI joints, and back will be happy. So will your knees, shoulders, and breath. (Add to this that you won’t even need to tuck your pelvis in yet another compensation. . . . I smell jackpot!).

If you want to try this, here are some considerations.

1.   If you really want to move more purely, your stance will likely become a little shorter (back to front) and maybe wider (left to right). It will also likely be higher – ie you likely won’t bend your front knee as deeply.

2.   Focus on the hip movement – ie the leg bone movement in your pelvis. Feel what is happening. Be attentive to each movement.

3.   Be aware of your pelvis. Don’t hold it rigid, just notice that it is staying where it is in space. Let it be quiet and still.

4.   Breathe easy and enjoy!

5.   Notice what you feel.

If you want to take this up a notch, I am running I Love Anatomy in February – an online Functional Anatomy program designed for yoga practitioners.  You can check it out here – http://bit.ly/2hx3D0u

Happy exploring!

Susi

Yoga for the Desk Jockey: Typing to Reduce/Prevent Repetitive Strain Injury

By Susi Hately, B.Sc. Kinesiology, C-IAYT Yoga Therapist

Repetitive strain injury from typing can occur anywhere along the hand, wrist, forearm, elbow, upper arm, shoulder, upper back, and neck. Most often it occurs in more than one of those areas. In many cases, symptoms can be reduced or alleviated with changes in posture or position.

The following typing technique can help prevent or alleviate symptoms of strain. It takes less than 2 minutes. 

1. Bend your elbows to 90 degrees. With your elbows at about 90 degrees, scoot yourself to your keyboard. If you need to bend your elbows more or straighten your elbows to reach the keyboard, adjust the height of your chair or the keyboard tray, or purchase an adjustable keyboard tray to enable a 90-degree-ish position at the elbows.
2. Align the middle knuckle with the center of your wrist. Are your hands deviating left or right, creating wrinkles at the side(s) of your wrists? If so, the middle knuckle is not aligned with the center of the wrist. Realign yourself.
3. Float your wrists above the wrist rest/lap top. Do you rest your wrists or forearms on the wrist rest, tabletop, or on your lap top, typing solely from your fingers? The pressure against the wrists can impede nerve flow to the fingers, increasing fatigue and pain. If you are at a desk top computer, allow the wrist rest to act like a cloud above which your wrists float. You are aiming to have gentle support, with very little or no bend in your wrists.
4. Use your whole arm. A tennis player would never use just the wrist to power the racket to hit a tennis ball. Same for you and your typing. Hover your fingers over home row on your keyboard. Now notice your shoulders. Do a few shoulder rolls (rolling the shoulders backwards). Notice how your shoulder position impacts your hand and finger position? Can you let the stronger, larger muscles of your back, shoulders, and arm position your hands so that your fingers can move lightly? Don’t be forceful or rigid about this, just notice.

If you want to take this to the next level, there are shoulder and arm exercises that help bring lightness and ease in the Yoga for the Desk Jockey book and audio cd. You can find it at http://bit.ly/2ibRdJp

This is just the start. . . . Remember to breathe and take breaks throughout your day – your fingers, hands, arms, neck, and back will love you for it.

Enjoy!

Susi

Your body changes from day to day, and you alone know your body best. Please be responsible with it, move with awareness and in a range that doesn’t increase pain.