By Susi Hately, B.Sc. Kinesiology, C-IAYT Yoga Therapist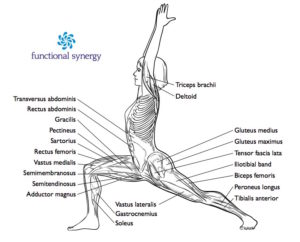
There are about seven yoga poses that have specifically had an impact on my growth as a teacher and yoga practitioner. One of those is Warrior 1. I have a distinct memory, from 15 years ago, of a yoga student who was riddled with pain and who wanted to be more comfortable in this pose. I helped her move better and almost fell over when I saw her vibrancy emerge. The pain through her body shifted, literally in a moment as her body settled into more comfort, strength, and ease. Her breathing seemed to blow wide open. It was amazing for me to see and added a huge boost to my confidence in those early days of trial and error.
Much of what I teach with Warrior 1 has been informed by that experience. Ultimately, it’s about finding ease, which in turn uncovers strength, suppleness, breath, and more ease.
Let’s dig deeper.
If you have been to a training session with me, you will know that I don’t tend to teach the “how tos” of the yoga poses. My job is to share my knowledge of functional anatomy, feeling, and subtle movement and how these features can create not only a situation for healing and recovery but also a pain-free practice – a practice that really serves your life as a yogi or yogini. From what I have seen, the yoga poses simply emerge from the body, naturally, organically in a very fluid way – and the practitioner begins to experience asana for what it really means – “sitting comfortably and still”. It’s a treat to see.
However, when it comes to Warrior 1, my views become stronger. I have seen many people burn themselves in this pose – in their knees, SI joints, backs, and shoulders. And it’s due to one primary thing.
Unsquare hips.
The process I see goes like this – I watch people step backward into Warrior 1, and I watch as simultaneously their pelvis becomes unsquare. I continue to watch as they re-square their hips – from a place of force and pull. Often their foot is grounded, making the matter worse. (Just typing this paragraph makes me hold my breath.)
So what would I love to see happen?
I’d love for people to get really clear about what is happening in their hip socket. The femur moves in six different directions. When we step back into Virabhadrasana 1, two movements are required – external rotation and extension. These are the movements that need to be cultivated. If you do, your pelvis, SI joints, and back will be happy. So will your knees, shoulders, and breath. (Add to this that you won’t even need to tuck your pelvis in yet another compensation. . . . I smell jackpot!).
If you want to try this, here are some considerations.
1. If you really want to move more purely, your stance will likely become a little shorter (back to front) and maybe wider (left to right). It will also likely be higher – ie you likely won’t bend your front knee as deeply.
2. Focus on the hip movement – ie the leg bone movement in your pelvis. Feel what is happening. Be attentive to each movement.
3. Be aware of your pelvis. Don’t hold it rigid, just notice that it is staying where it is in space. Let it be quiet and still.
4. Breathe easy and enjoy!
5. Notice what you feel.
If you want to take this up a notch, I am running I Love Anatomy in February – an online Functional Anatomy program designed for yoga practitioners. You can check it out here – http://bit.ly/2hx3D0u
Happy exploring!
Susi